Containerizing own applications
When orchestrating your application we rely on images either
available on dockerhub or being able to be built locally.
This tutorial will walk you through the design process of containerizing
a web application, using Wordpress as an example.
General
When containerizing apps for the Green Metrics Tool,
the containers must not shut down after starting them.
So you either must have a daemon / process running inside the container
that keeps the container running or use the command option in the usage_scenario.yml →
file to start a shell that keeps the container running.
This is because our tool sends the commands to the containers after they have
all been orchestrated and does not support one-off container starts with parameters.
Containerizing
Our architecture looks like the following:
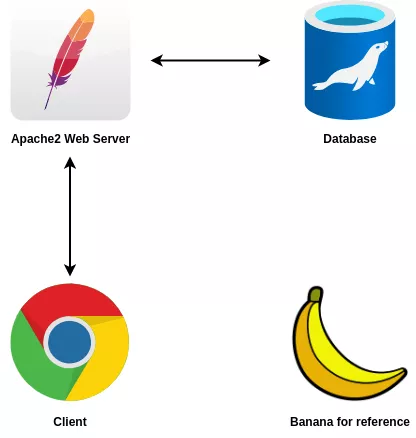
We will now containerize the webserver, database, and client inside separate containers.
The reason for this scoping is that the Green Metrics Tool reports on a container level
and we are interested in showing all these metrics separately.
Technically you could also measure the architecture without the client side, but we
believe that the energy consumption of software includes both sides, as well as the
network usage.
Directory structure
We first prepare the directory structure and create the folder /tmp/demo-app.
This is where our containerized app will be put into.
mkdir /tmp/demo-app
Here you see a list of the final files and directories that we will end up with:
.
├── ./html
├── usage_scenario.yml
├── Dockerfile-wordpress
├── wordpress.conf
├── compose.yml
└── ...
The compose.yml is technically not needed, but it makes
initial testing and debugging far easier.
We encourage you to always start with setting up a compose.yml
and then migrating the contents of the file to our usage_scenario.yml file,
adding the flow and extra attributes you need on top.
We have found this to be the easiest workflow to containerizing your application.
Webserver
We are basing the container off of wordpress:latest, which includes an
apache webserver as well as a PHP runtime.
In the container we want the webserver to listen on port 9875, therefore we have
to create a new virtual host.
The virtualhost should have a hostname identical to the container.
We set this container name later, so see it as given for the moment.
Setup your wordpress.conf file as follows:
Listen 9875
<VirtualHost *:9875>
    DocumentRoot /var/www/html
    ServerName green-coding-wordpress-apache-data-container
    ErrorLog ${APACHE_LOG_DIR}/error.log
    CustomLog ${APACHE_LOG_DIR}/access.log combined
    <Directory /var/www/html>
        Options FollowSymLinks
        AllowOverride Limit Options FileInfo
        DirectoryIndex index.php
        Require all granted
    </Directory>
    <Directory /var/www/html/wp-content>
        Options FollowSymLinks
        Require all granted
    </Directory>
</VirtualHost>
We will now create the Dockerfile Dockerfile-wordpress as follows:
# Dockerfile-wordpress
FROM wordpress:latest
EXPOSE 9875
COPY ./html /var/www/html
COPY ./wordpress.conf /etc/apache2/sites-enabled/wordpress.conf
By copying the wordpress.conf to the apache vhost directory we let webserver know
to deliver the website on port 9875 for host green-coding-wordpress-apache-data-container
We will also dump the filesystem of our existing Wordpress app,
so we can ingest it into the container:
cp -R /PATH/TO/WORDPRESS /tmp/demo-app/html
Database
We assume a MariaDB database and will base off their mariadb basic image.
We pull a dump from our database and copy the wordpress filesystem:
mysqldump -u USERNAME -p DATABASE_NAME > /tmp/demo-app/wordpress-dump.sql
We will now create the Dockerfile Dockerfile-mariadb as follows:
# Dockerfile-mariadb
FROM mariadb:10.6.4-focal
COPY ./wordpress-dump.sql /docker-entrypoint-initdb.d/wordpress-dump.sql
EXPOSE 3306
As you can see we are copying the dump inside the database container.
Thanks to some magic from the folks at MariaDB this container image will automatically
pick up the dump and import it.
Now for the compose.yml:
services:
  db:
    build:
      context: .
      dockerfile: Dockerfile-mariadb
    container_name: gcb-wordpress-mariadb
    image: gcb_wordpress_mariadb
    restart: always
    environment:
      - MYSQL_ROOT_PASSWORD=somewordpress
      - MYSQL_DATABASE=wordpress
      - MYSQL_USER=wordpress
      - MYSQL_PASSWORD=wordpress
    expose:
      - 3306
  wordpress:
    build:
      context: .
      dockerfile: Dockerfile-wordpress
    container_name: gcb-wordpress-apache
    image: gcb_wordpress_apache
    expose:
      - 9875
    ports:
      - 9875:9875
    restart: always
    environment:
      - WORDPRESS_DB_HOST=db
      - WORDPRESS_DB_USER=wordpress
      - WORDPRESS_DB_PASSWORD=wordpress
      - WORDPRESS_DB_NAME=wordpress
    depends_on:
      - db
Puppeteer for client side
In order to simulate a client we need a container running a headless browser.
We choose Puppeteer and provide an example container to build here: https://github.com/green-coding-berlin/example-applications/tree/main/puppeteer-firefox-chrome
You can also download the container directly from docker hub here: Docker Hub
Moving to usage_scenario.yml
The next step, after checking that all containers orchestrate correctly
and can talk to each other as expected, would be to move the compose.yml to our
usage_scenario.yml format.
The resulting file would look like this:
# We need an explicit networks part, as we do not auto-generate networks for containers
networks:
  example-network:

services:
# There is no container_name directive. All services keys act directly as container names
  db-container:
# If you build your file with docker compose in the example above this image name should be the one you have now locally
    image: demo_app_db
    container_name: demo-app-db
    environment:
      - MYSQL_ROOT_PASSWORD=somewordpress
      - MYSQL_DATABASE=wordpress
      - MYSQL_USER=wordpress
      - MYSQL_PASSWORD=wordpress
# networks must be explicitly stated in each service
    networks:
      - example-network
  wordpress-container:
    image: demo_app_wordpress
    container_name: demo-app-wordpress
    ports:
      - 9875:9875
    restart: always
    environment:
      - WORDPRESS_DB_HOST=db
      - WORDPRESS_DB_USER=wordpress
      - WORDPRESS_DB_PASSWORD=wordpress
      - WORDPRESS_DB_NAME=wordpress
    networks:
      - example-network

flow:
# Is discussed in "Interacting with applications"
...
Finish
You are now done containerizing your web application.
All you need is a flow to interact from the Puppeteer container with the webserver.
Have a look at the tutorial on: Interacting with application →
and from there create your usage_scenario.yml → file based off your compose.yml file.
Afterwards run the measurements.
An example how to run a measurement locally can be found here: Measuring locally →
To see all final files in an example of what we introduced here go to the Example app
Help / Debugging
If you run into any errors see the Debugging → page.